


はじめに
前回のcameraサンプルを改良して動画を再生できるようにしたいと思います。
また、画面に日本語を表示しようとすると文字化けするので表示出来るようにします。
ファイルコピー
camera.pyをコピーしてvideo.pyを作成します。
日本語表示
日本語対応のフォントに変更することで表示可能となります。以下はWindowsにインストールされている「MS ゴシック」の設定です。
from kivy.core.text import LabelBase, DEFAULT_FONT
LabelBase.register(DEFAULT_FONT, "c:/windows/fonts/msgothic.ttc")
画面改良
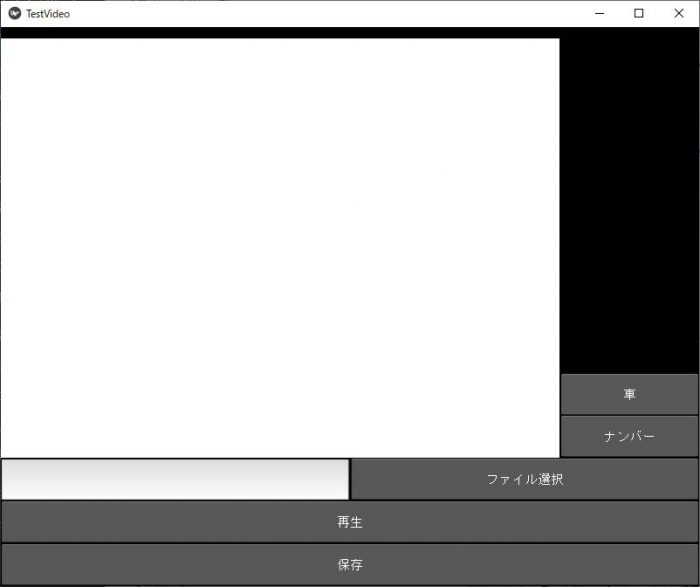
・ファイルダイアログを利用して動画ファイルを選択してファイル名を表示するように修正
・Face、Mosaicを車、ナンバーに修正
その他、Playを再生 Captureを保存にしました。

改良したソースファイル
保存先は、D:\PyDev\GuiKivyです。
仮想環境のアクティブ化を忘れずに実行します。env\Scripts\activate
from kivy.config import Config
Config.set('graphics', 'width', '800')
Config.set('graphics', 'height', '640')

from kivy.app import App
from kivy.lang import Builder
from kivy.uix.boxlayout import BoxLayout
import time
import cv2
from kivy.uix.image import Image
from kivy.graphics.texture import Texture
from kivy.properties import StringProperty, ObjectProperty
from kivy.clock import Clock

import os
from kivy.uix.floatlayout import FloatLayout
from kivy.uix.popup import Popup
from kivy.uix.textinput import TextInput

# 日本語表示対応
from kivy.core.text import LabelBase, DEFAULT_FONT
LabelBase.register(DEFAULT_FONT, "c:/windows/fonts/msgothic.ttc")

Builder.load_string('''
<CameraClick>:
    orientation: 'vertical'
    padding: 0
    spacing: 1
    size_hint_y: None

    BoxLayout:
        orientation: 'horizontal'
        padding: 0
        spacing: 1

        Image:
            id: camera
            size_hint: None, None
            size: 640, 480

        BoxLayout:
            orientation: 'vertical'
            ToggleButton:
                text: '車'
                on_press: root.face()
                size_hint_y: None
                height: '48dp'
            ToggleButton:
                text: 'ナンバー'
                on_press: root.mosaic()
                size_hint_y: None
                height: '48dp'

    BoxLayout:
        orientation: 'horizontal'
        padding: 0
        spacing: 1
        size_hint_y: None
        height: '48dp'

        TextInput:
            id: txtFName
            text: ''
            multiline: False

        Button:
            text: 'ファイル選択'
            on_press: root.fileSelect()

    ToggleButton:
        text: '再生'
        on_press: root.play()
        size_hint_y: None
        height: '48dp'

    Button:
        text: '保存'
        size_hint_y: None
        height: '48dp'
        on_press: root.capture()

<LoadDialog>:
    BoxLayout:
        size: root.size
        pos: root.pos
        orientation: 'vertical'
        FileChooserListView:
            id: filechooser

        BoxLayout:
            size_hint_y : None
            height : 30
            Button:
                text: 'キャンセル'
                on_release: root.cancel()

            Button:
                text: '読み込み'
                on_release: root.load(filechooser.path, filechooser.selection)
''')

class LoadDialog(FloatLayout):
    load = ObjectProperty(None)
    cancel = ObjectProperty(None)

class CameraClick(BoxLayout):
    image_texture = ObjectProperty(None)
    image_capture = ObjectProperty(None)

    def fileSelect(self):
        content = LoadDialog(load = self.load, cancel = self.dismiss_popup)
        self._popup = Popup( title="動画ファイル選択中", content=content, size_hint=(0.9,0.9))
        self._popup.open()

    def load (self, path, filename):
        txtFName = self.ids['txtFName']
        txtFName.text = filename[0]
        self.dismiss_popup()

    def dismiss_popup(self):
        self._popup.dismiss()

    def face(self):
        global flgFace
        flgFace = not flgFace

    def mosaic(self):
        global flgMosaic
        flgMosaic = not flgMosaic

    def play(self):
        global flgPlay
        flgPlay = not flgPlay
        if flgPlay == True:
            txtFName = self.ids['txtFName']
            self.image_capture = cv2.VideoCapture(txtFName.text)
            Clock.schedule_interval(self.update, 1.0 / 30)
        else:
            Clock.unschedule(self.update)
            self.image_capture.release()

    def update(self, dt):
            ret, frame = self.image_capture.read()
            if ret:
                if flgFace == True or flgMosaic == True:
                    # カスケードファイルを指定して検出器を作成
                    cascade_file = "haarcascade_frontalface_alt.xml"
                    cascade = cv2.CascadeClassifier(cascade_file)
                    # カメラ映像をグレースケールに変換
                    frame_gray = cv2.cvtColor(frame, cv2.COLOR_BGR2GRAY)
                    # 顔検出
                    face_list = cascade.detectMultiScale(frame_gray, minSize=(30, 30))
                    if len(face_list) > 0:
                        red = (0, 0, 255)
                        for (x, y, w, h) in face_list:
                            if flgFace == True:
                                frame = cv2.rectangle(frame, (x, y), (x+w, y+h), red, thickness = 2)
                            if flgMosaic == True:
                                frame = self.procMosaic(frame, (x, y, x+w, y+h), 5)
                # カメラ映像を上下反転
                buf = cv2.flip(frame, 0)
                # カメラ映像を上下左右反転
                #buf = cv2.flip(frame, -1)
                image_texture = Texture.create(size=(frame.shape[1], frame.shape[0]), colorfmt='bgr')
                image_texture.blit_buffer(buf.tostring(), colorfmt='bgr', bufferfmt='ubyte')
                camera = self.ids['camera']
                camera.texture = image_texture

    def capture(self):
        '''
        Function to capture the images and give them the names
        according to their captured time and date.
        '''
        camera = self.ids['camera']
        timestr = time.strftime("%Y%m%d_%H%M%S")
        camera.export_to_png("IMG_{}.png".format(timestr))
        print("Captured")

    def procMosaic(self, img, rect, size):
        # モザイクをかける領域を取得
        (x1, y1, x2, y2) = rect
        w = x2 - x1
        h = y2 -y1
        i_rect =img[y1:y2, x1:x2]
        # 一度縮小して拡大する
        i_small = cv2.resize(i_rect, (size, size))
        i_mos = cv2.resize(i_small, (w, h), interpolation=cv2.INTER_AREA)
        # 画像にモザイク画像を重ねる
        img2 = img.copy()
        img2[y1:y2, x1:x2] = i_mos
        return img2


class TestVideo(App):

    def build(self):
        return CameraClick()


flgPlay = False
flgFace = False
flgMosaic = False
TestVideo().run()
ちょこっと解説
Windowサイズの指定
・1行目~3行目までで指定しております。
ファイルダイアログ
・82行目~99行目までで画面定義してます。FileChooserListViewを利用すると実現できます。
・ファイルを読み込むとテキストボックスにファイル名が表示されます。
動画再生
・再生ボタンをクリックするとテキストボックスに表示されているファイル名をcv2.VideoCaptureに引数として渡す事で再生します。
・もう一度再生ボタンをクリックすると動画は停止され、再度、再生すると最初から再生します。
最後に
cv2.VideoCapture の引数に動画ファイル名を指定するだけで簡単に改良できたのですが、Windowのサイズ設定やファイルダイアログの実装で試行錯誤してしまいました。
車やナンバーの認識は今回実装できておりません(顔認識のまま)ので、今後の課題です(^^;)
改良の余地ありありなので自分用試行錯誤メモな感じです。参考にされる場合はご注意ください。